If you’ve never quite got around to working out how to use Google Search Console, now is the time to find out. Whether you’re just at the website design stage of a new enterprise or you’ve got a business website that has been up and running for years, SEO is something you can’t afford to ignore. Learning how to use Google Search Console will help make the most of your SEO efforts.
There are literally dozens of tools available to help you with SEO and data analytics. Some are free, and others offer a monthly subscription. Here, we are going to be talking about one of those rare occasions when the most valuable tool of all costs you absolutely nothing.
Google Search Console and Google Analytics
Google Search Console (GSC) is one of a suite of free data analytics tools provided by Google. The tool provides reports and data on how your site interacts with search engines and offers suggestions on simple ways you can optimize site performance.
People often confuse GSC with Google Analytics (GA), which is another free tool offered by Google. To get the best out of your site, you should learn your way around both. However, we will save an in-depth look at GA for another day.
Suffice it to say for now that GA is all about your site’s performance in terms of user engagement, looking at the human side of SEO. It examines things like traffic, visitor demographics, how long people spend on your site, and so on. GSC, on the other hand, is concerned with technical data that reflects how your site is performing in Google search. Here, you can examine metrics like search queries, click-through rates, backlinks from other websites, HTML errors, and your internal linking structure.
In other words, while GA is about who visits your site, Google Search Console analyzes how your website appears on the Google search results.
Getting started
1. Register your site
To register with Google Search Console , you just need a Google account and verification data to prove you own the website. You can get this by logging into your domain name provider (eg, Godaddy). The registration process walks you through each step.
There are two “property types” you can register, either “Domain” or “URL-prefix.” Google provides a detailed explanation about the difference between the two, and it’s worth a few minutes of your time to read it. In brief, “Domain” consolidates all the subdomains of your website (for example, mysite.com, blog.mysite.com, etc.) and protocols (for example, http, https). The URL-prefix option only covers a specific URL and protocol. While there are technical reasons why some people might choose the URL-prefix option, most will go for “Domain.”
2. Create your sitemap
Once you are registered and verified, the next step is to create a sitemap. This is precisely what it sounds like – a map of what is where on your site. Google’s web crawlers use a site map to understand and index your content.
There are a few different ways to create your sitemap. If yours is one of the 600 million websites that are powered by WordPress, there are simple plugins that will produce a sitemap for you. Google XML is a popular choice, but there are other options from respected developers like Yoast and Screaming Frog that are part of their free SEO packages. If you find yourself getting a little lost, you can always get in touch with us at Hummingbird Web Design for some friendly advice and expert guidance.
For non-Wordpress users, other software options are available that make it easy for anyone to create a sitemap. Google provides some details here.
3. Check the indexing
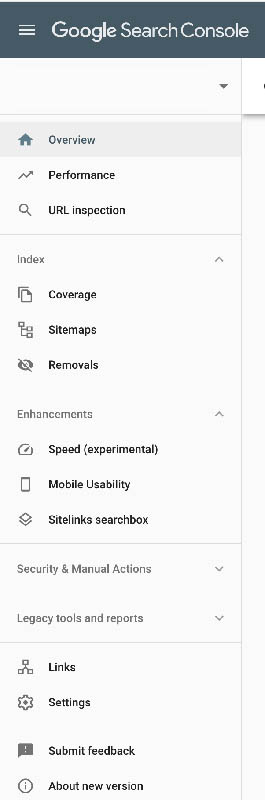
Now you will be able to start using the tools in Google Search Console. But before we dive into that, you should check that Google is crawling and indexing your domain correctly. If it isn’t, it means that some or all of your site is essentially “invisible” to Google and also to searchers.
Go to Index and Coverage to see how many pages Google has indexed. If it’s anything above zero, you know that at least some of your site is there. It should be clear from the number whether anything is missing. If the site is not indexed, or if it is only showing a handful of pages when you know the site actually has more, you can request indexing. Go to the URL inspection tool, wait for Google to check the page, and then hit the “request indexing” button.
Next steps
Now that you have registered your site, created a sitemap, and got it properly indexed, you can get down to serious business. That means using Google Search Console to boost your SEO. Give us a call 516-883-3851 for professional help in creating the right SEO stragegy for your small business. And check back here for out next blog post where we’ll take some of the mystery out of Google Analytics.


Leave A Comment